Over the course of the last nine weeks, I have had the opportunity to familiarize myself with the entire Adobe Creative Cloud Suite. When I began taking a Style and Design class, as a part of my public relations curriculum, I had little to no idea what the Adobe Creative Cloud was—or what applications it was comprised of—much less how to utilize these platforms.
Feeling stressed and overwhelmed, I did what I’ve always been told to do: start small and start with the basics. I began learning the simple maneuvers for programs such as Photoshop, InDesign, Illustrator, and Lightroom.
I familiarized myself with specific functions like the Layers panel within Photoshop, the Direct Selection tool within Illustrator, and the Rectangle Frame tool within InDesign. Each of these tools serves a specific purpose, all of which allow creators to bring their visions to life.
While I still have so much to learn, I am pleased with my progress so far. As I’ve begun to understand how to operate these programs, naturally, I have developed a personal favorite, which is Lightroom.
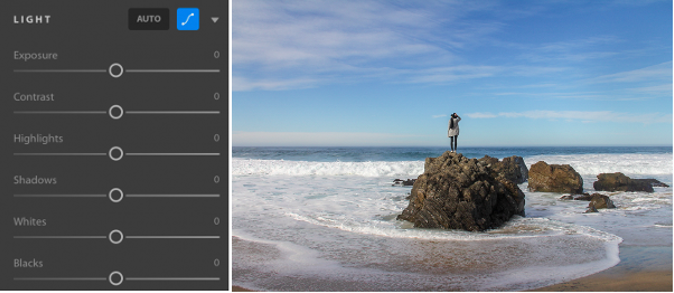
Lightroom offers efficient and streamlined tools, which can be used to edit, organize, share and store photos. Lightroom is incredibly user-friendly and has equipped me with the tools necessary to make my photos pop! By using controls found in the Light panel, you have the ability to tweak the lighting in any manner you choose. You can adjust the exposure or contrast levels, as well as the highlights, to ensure that your images stand out.
By utilizing features in the Light panel, I was able to edit the image above. I began by dragging the Exposure slider slightly to the right in order to brighten the photo, overall. Next, I wanted to increase contrast, so I slid that slider over to the right, as well. In an effort to bring out details in the lighter areas, I slid the Highlights slider all the way to the left. I wanted to continue to lighten the sky and bring out details in darker areas like the stones; therefore, I slid the Shadows slider midway to the right. I ended up leaving the White and Black sliders alone since I felt happy with them set at 0.

At this stage, my photo editing was almost complete. Before calling it a day, I wanted to play around with the Vibrance and Saturation sliders to control color intensity. I shifted both sliders to the right, to ensure that the blues in the sky and the ocean would stand out.
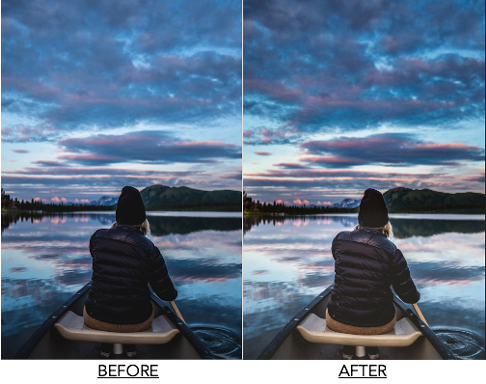
After gaining confidence with the most basic features of Lightroom, I began to explore additional features, specifically, the Linear Gradient tool. The Linear Gradient tool allows you to adjust the foreground of a landscape photo, which I did to this image. By using this tool, along with the various editing panels and tools, I manipulated the photo. I utilized the Brush tool to help me lighten the color of her coat, and I relied on the Healing tool to help me adjust the opacity.
The image turned out exactly as I’d hoped it would.

While at first, it can seem so daunting to tackle the Adobe Creative Cloud, I highly encourage you to do so! These applications are so beneficial in helping projects come to fruition. Just remember to do your best and to be patient.
Happy Designing, everyone!